|
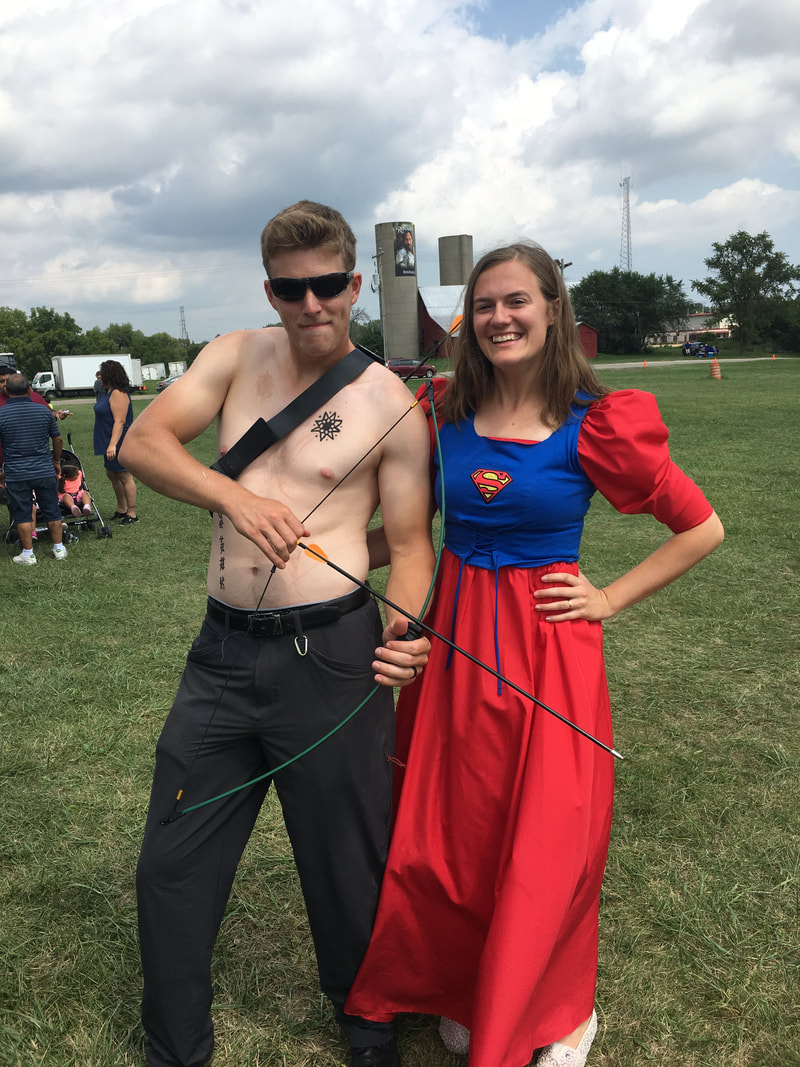
It's been awhile since my last post and that's cause we've been so busy. Unfortunately, not necessarily exercising my creative muscle. My friend did give me the opportunity when she invited us to the local renaissance faire. The theme the weekend we were going was heroes/villains. I knew right away I wanted to blend Ren Faire with Superhero. I was inspired on pinterest by the sight below. While I knew I would never be able to capture this like the TuxBoard did (link over name), I wanted to try. 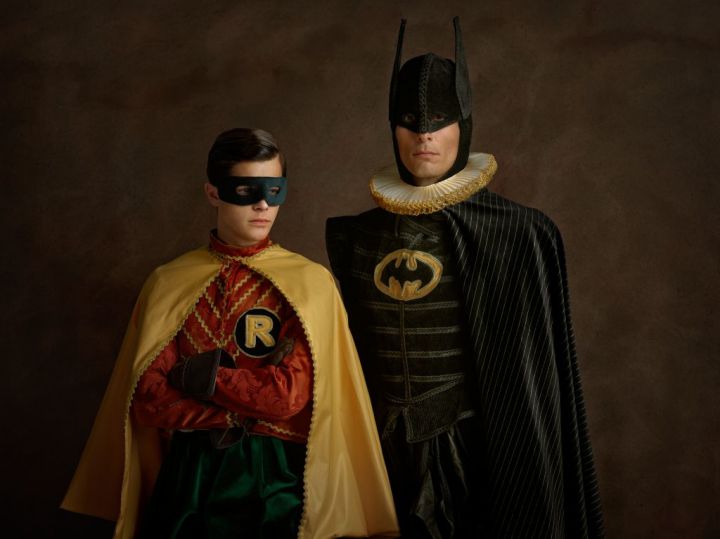 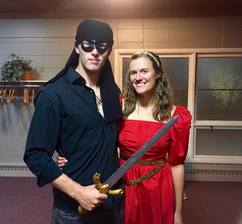 I looked in my closet to see what I already had. Reminder, I was busy so I was working with what I already had. Remember the dress from my Princess Bride Pary post? If not, here it is again -> I knew this would be my best option for a starting point. This mean I was looking for heros/villians that wear red. While we could just go with our Westley/Buttercup combo I felt like that was cheating because Buttercup didn't really count as a hero or villain.  Knowing that red was going to have to be the base, it wasn't long before I chose Supergirl. It wouldn't require a lot of makeup work and would be iconic with the symbol and colors. So I started thinking about how to incorporate blue on the top. I started thinking corset-esque item. I found a how to for a turkish vest (below) out of a t-shirt and score, I had a blue t-shirt. I kept the cut a little high to save room for they symbol.
Now I just needed a costume for their baby. My husband got me stuck on "Crier Tuck" so she was going to be a monk. I took to pinterest and used Jennifer Roberts Idea which you can find here. Final results were pretty good! (even if the baby did only stayed dressed long enough for the picture...) even in that time she turned some heads!
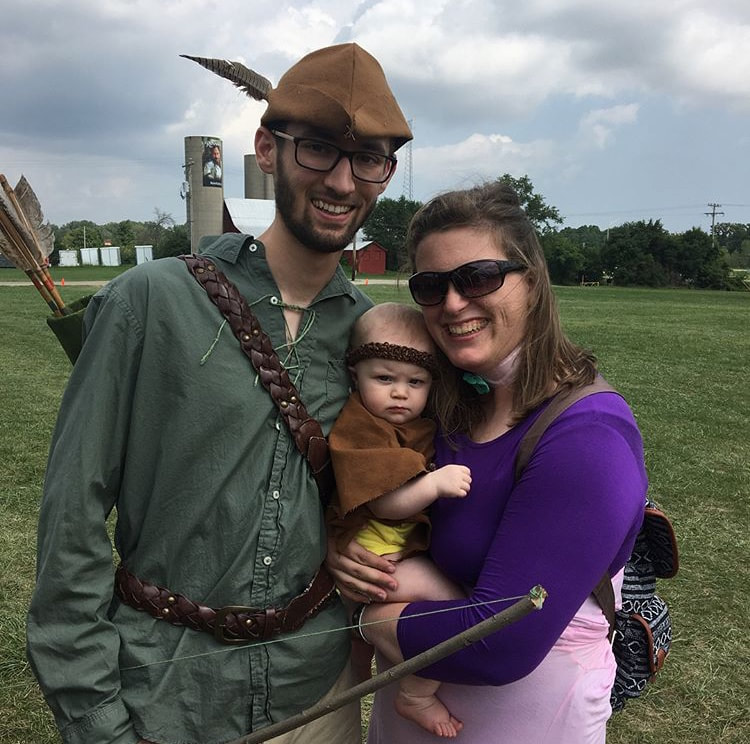
Now for my husband. He wanted to be the Green Arrow. A great choice because he seems to slightly resemble Oliver Queen. However, we couldn't agree on anything for the hooded top. Finally, fed up with his refusal to agree with any patterns I could find I jokingly I said well then just go like this: To that he agreed. That left me with a new challenge of giving him tattoos and scars. Again, I went to youtube! I stuck with ones that looked like I could do it and used materials I could find.
These both worked, but took a while. The scars were hard to make big enough to be seen really well. But if you were standing next to him in person they were definitely there and freaked our friends out who hadn't seen my husband shirtless. They were concerned and asked what had happened. But they were not as obvious as in the video because I just brushed a pinkish foundation over the top instead of painting them because I did not want them to look fresh. They looked good but not as big as what Oliver Queen has. Here were our final results:
Our costumes were just what I promised! Not the best, not the worst. The highlight of my day was when people would ask to take a picture with Robin Hood or the boy excitedly pulling at his mom's arm pointing and exclaiming, "It's the Green Arrow!" To me, that was the truest indicator of success!
0 Comments
Yesterday, my husband and I celebrated our 2 year anniversary! WOO HOO! It isn't that far into the marriage, but I still am one to find any reason I can to celebrate. Especially, when I have a chance to spoil my handsome man. I don't know about you other ladies, but I was super excited for our first wedding anniversary. I expected it to be a big deal. I'm not sure why I did, because my parents never did anything special for their anniversary, but none the less, I had high expectations. Needless to say, the actual day fell short. My poor husband had no idea what to do on a wedding anniversary because he'd never had one before. As the day went on, we found and developed a tradition for our anniversary that is easy, affordable and sentimental. This would work for any couple with some wall space.
This was also the start of my first summer in our new house and I was looking for ideas for turning it into a home. We had the walls pretty well covered except for one stretch of hallway that led to our bedroom. I needed something for these walls. This is when our perfect anniversary tradition was born. We go through pictures of all of our adventures since our last anniversary. We talk about our favorite trips or moments. What we really enjoyed doing with the other and how those moments highlight traits we love about the other person. Together we find one photo from the year that really captures a moment we both loved. We order a print if we don't already have one and make a frame for it and add it to our wall. I love it for a few reasons.
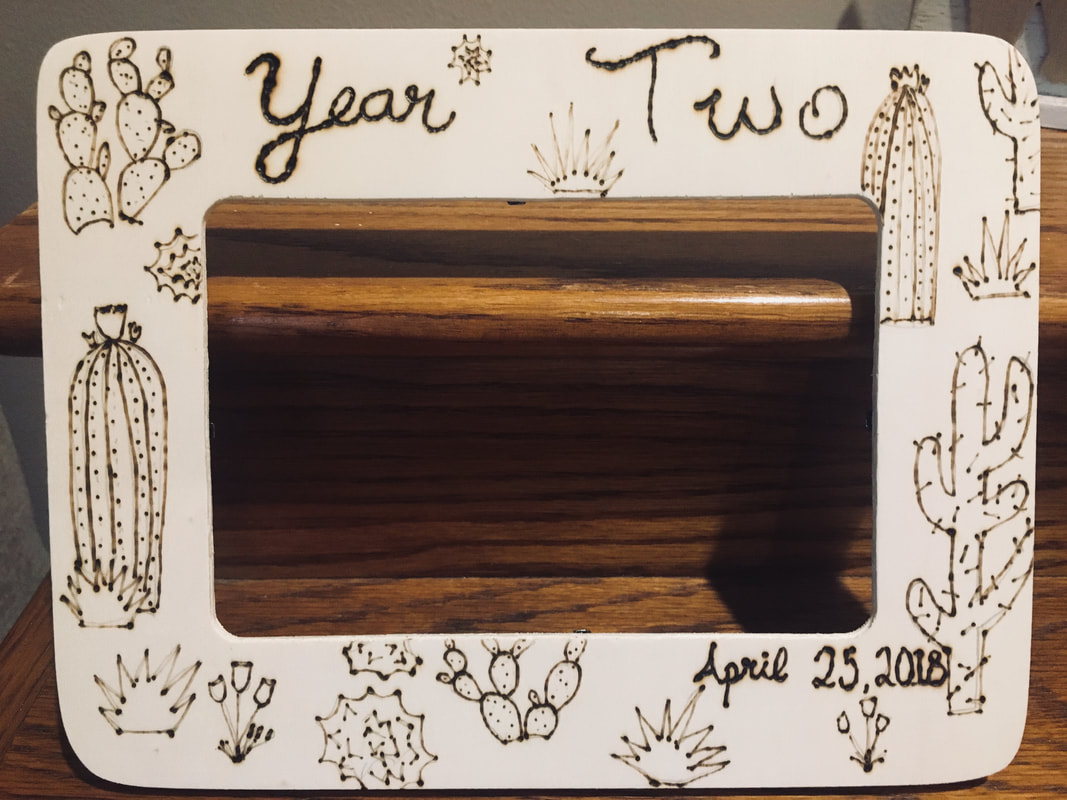
So, with this being our second anniversary, I have three pictures on my wall now. Examples: I wanted one from the wedding to start off the wall. Again, it was through discussion with my husband we decided on this rather nontraditional wedding photo of our failed attempt at a stunt during our first dance. My husband shared that it captured my ability to have fun when plans don't work out like we hoped which is something he loved in me. I love that we are both having fun together. The frame is the same color we used at our wedding and was actually a wedding present. I used an engraver my mom gave me for my birthday to put in the title "The Beginning" and the date. The engraver simply chipped off the paint allowing the different color underneath to be exposed and I really liked how it looked. I recommend checking/practicing on the back of the frame your engraver, wood burner, paint pen, etc. to make sure it works first. A lesson learned from the next frame.  The next year we chose a more traditional photo and just bought a cheap frame at Target. When I went to wood burn it though I learned it was not made with wood. The engraver did not work on it either and it left me with a smelly craft room as I committed to the wood burning to put in the year and date. This is what made me decide to go very cheap the next year and get the wood craft frame that I know would work with my wood burner.
 Now I can't wait for the print to come in to have it join our others on the wall! I can't wait to watch our wall slowly fill up with memories. As time passes and more of the wall is covered, I think it will be an amazing visual representation of all that we've been through together. Now I look forward to my anniversaries, not to be lavished with gifts, but to be able to sit down with my husband and talk about our year as we look forward to what's to come! Happy Anniversary Love, I look forward to many more!
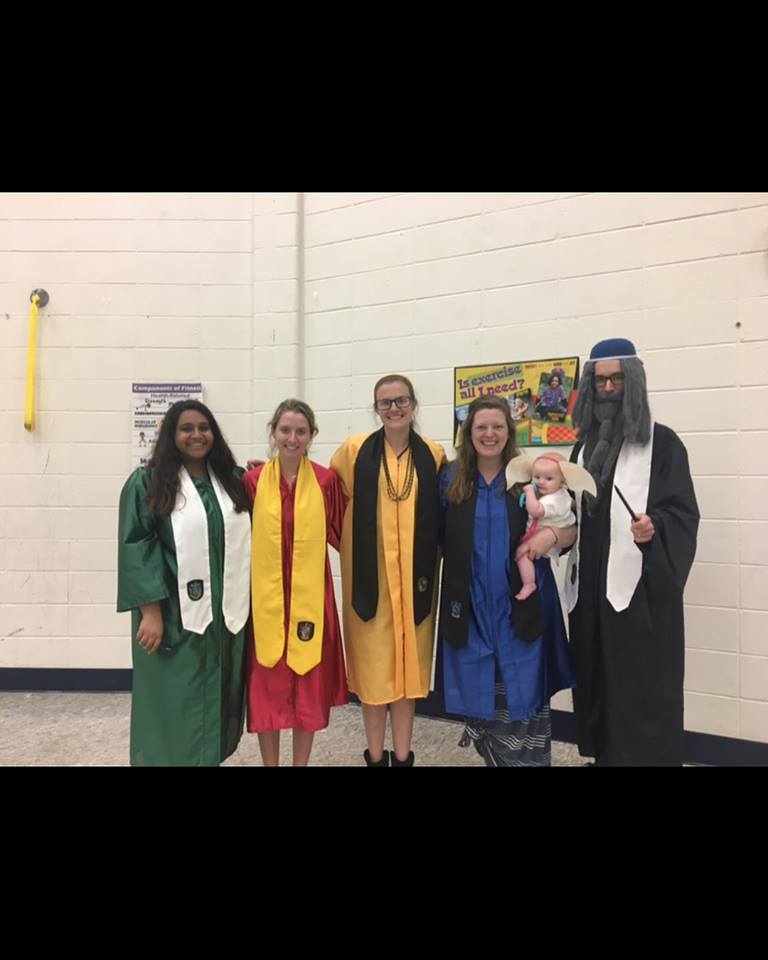
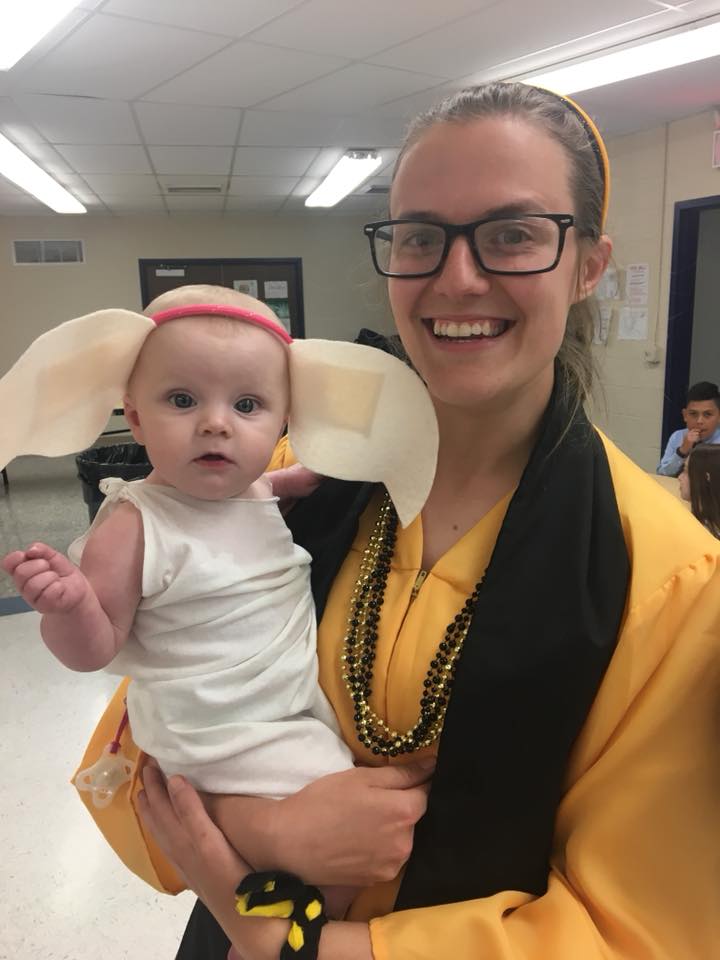
Last Year I posted a fun way to keep gets engaged and learning in the last week of the year. Well, I'm back to tell you how much it really works. Our kids started asking a while ago when we were starting the Triwizard competition. If you do not know what I'm talking about check out my post about the Triwizard Tournament from last year. This is merely an update of the face lift we gave it this year so you can keep improving it in your classroom too! So naturally, we stepped up our game. We started with our looks. A coworker went and made us look quite scholarly with stoles for our house as well as matching graduation robes. We also invited Dumbledore and Dobby this year.
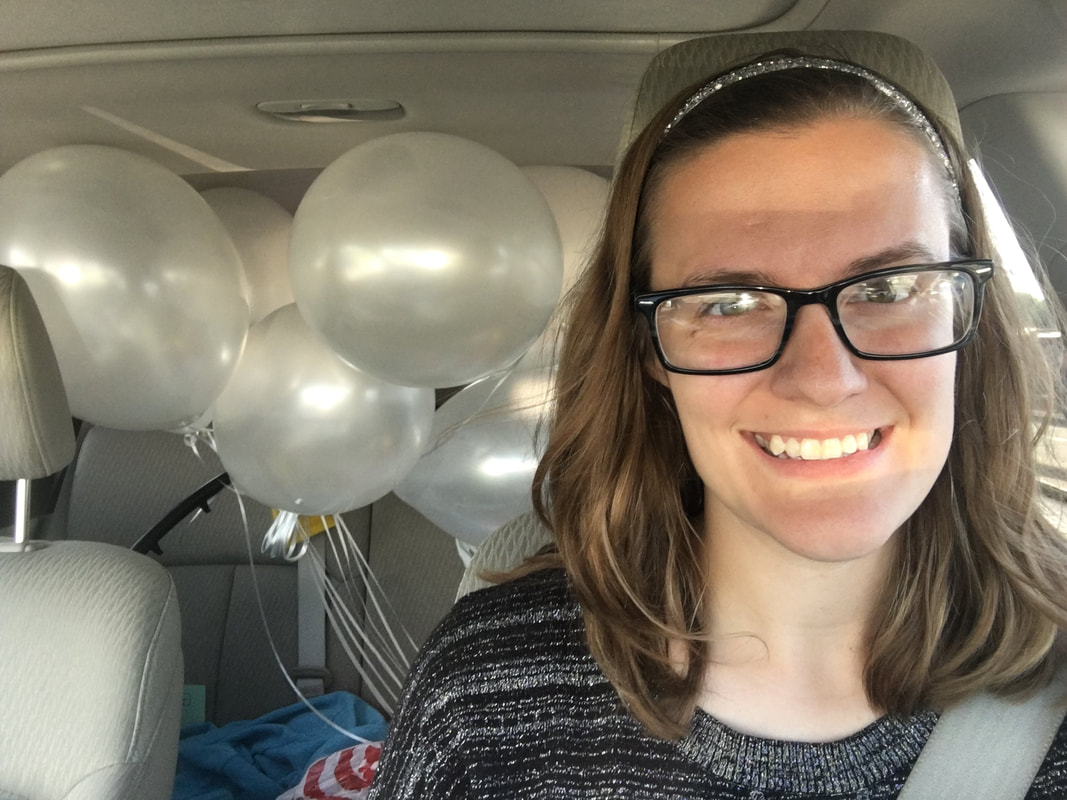
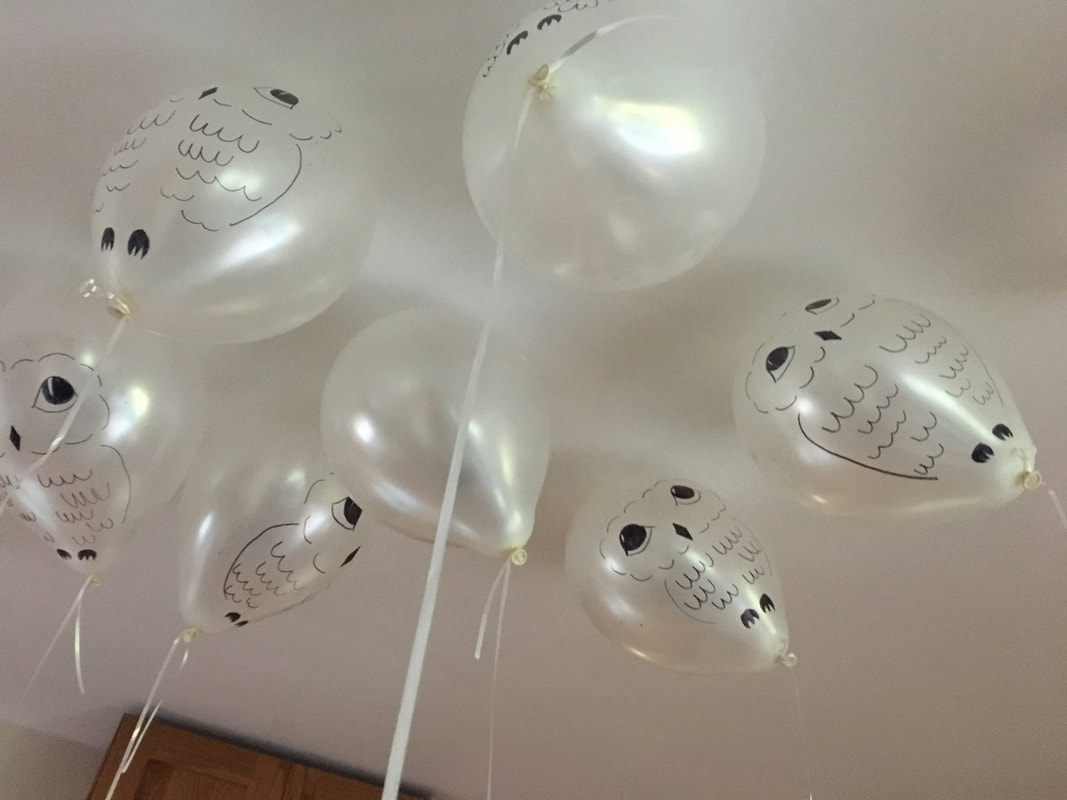
 Anticipatory SetThe kids already knew about the TriWizard tournament from last year, and were asking constantly about when it was going to start. To kick it off this year, the friday before we began we got permission from their teachers to deliver their invitations to Hogwarts via "owls". A trip to party city and 10 helium balloons later had our owls ready to deliver.
Once I had all of the owls drawn on, I printed letters from "the Hungry Teacher's" free download on Teachers Pay Teachers. You can find it here. We edited to fit our needs, tied it as a scroll on the ribbon at the bottom of the balloon and threw it into the rooms. Kids loved it. Not only did they go crazy in excitement, students took care of the owls and asked to bring them or the letters home. It was a lot of fun. And they couldn't wait for Monday to come! Day OneWe added the backdrop above to the start of our math hallway and once they entered we had each of our rooms decked out in house colors, including covering our lights in our colors so our hallway section glowed out colors. Our kids said things like "Well, that's pretty cool!". It was magical. But for the sorting hat ceremony we moved to the "great hall". Yes, we had floating candles in the cafeteria where they were addressed by Dumbledore himself before being sorted to their house. The face lift this year definitely hyped them up for the week. 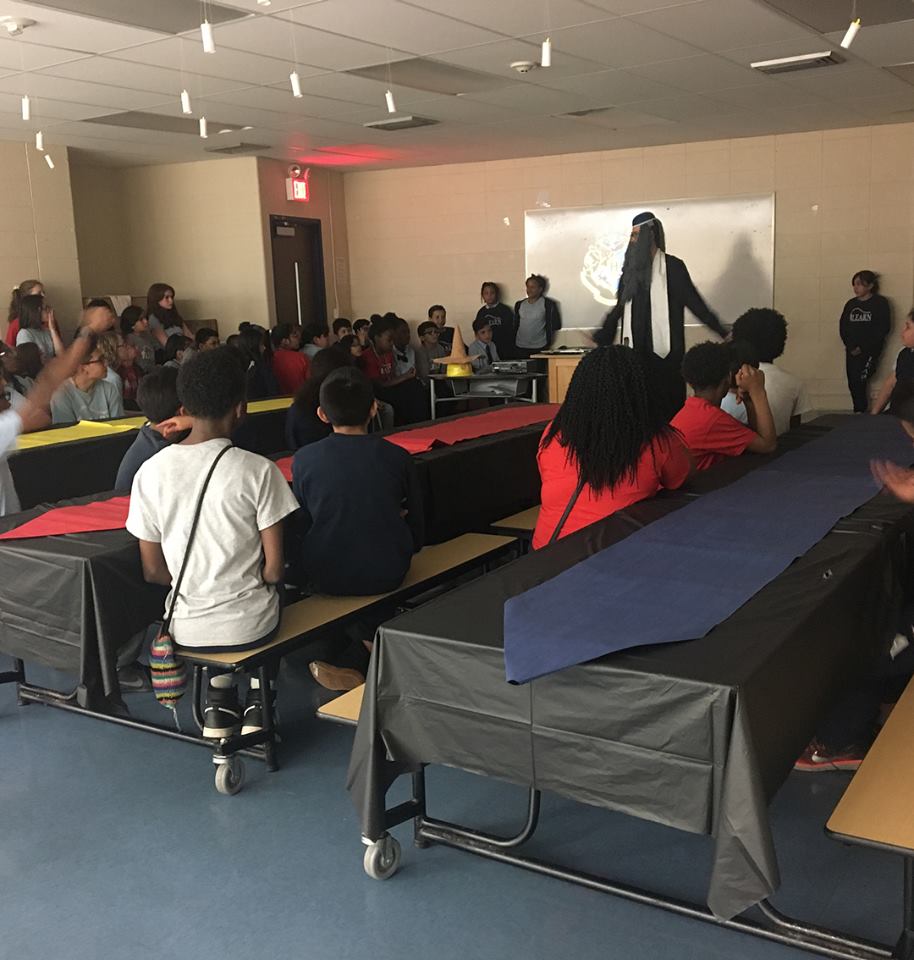
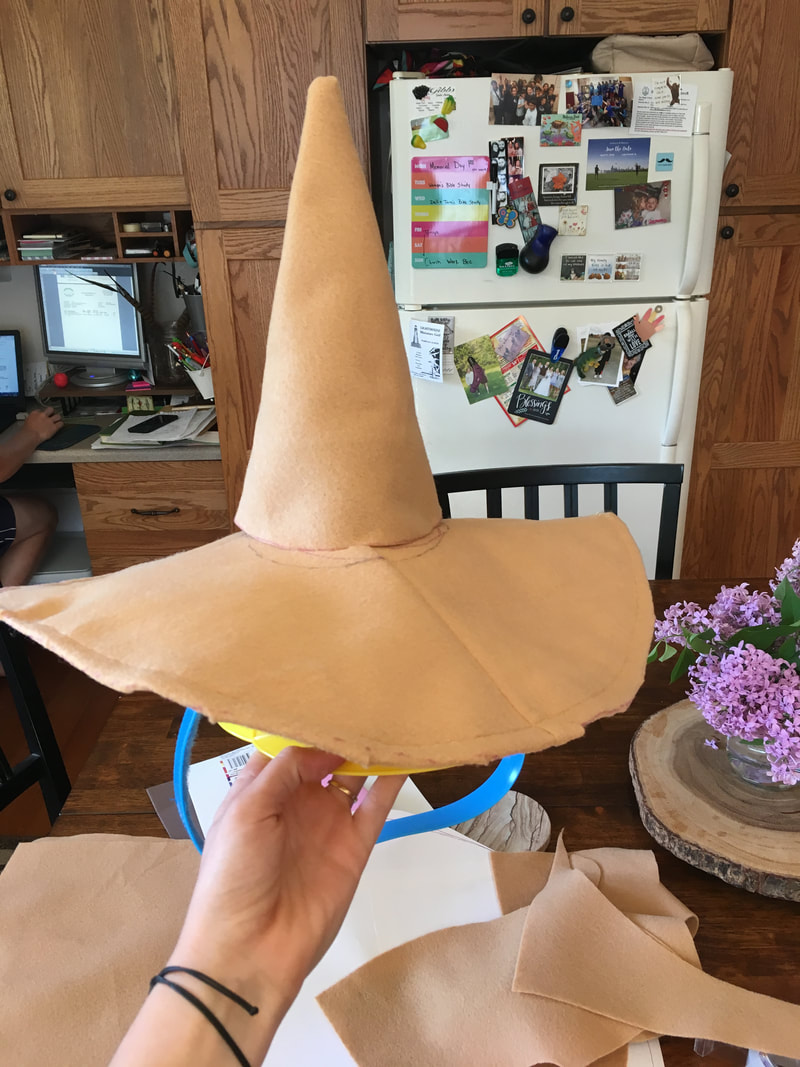
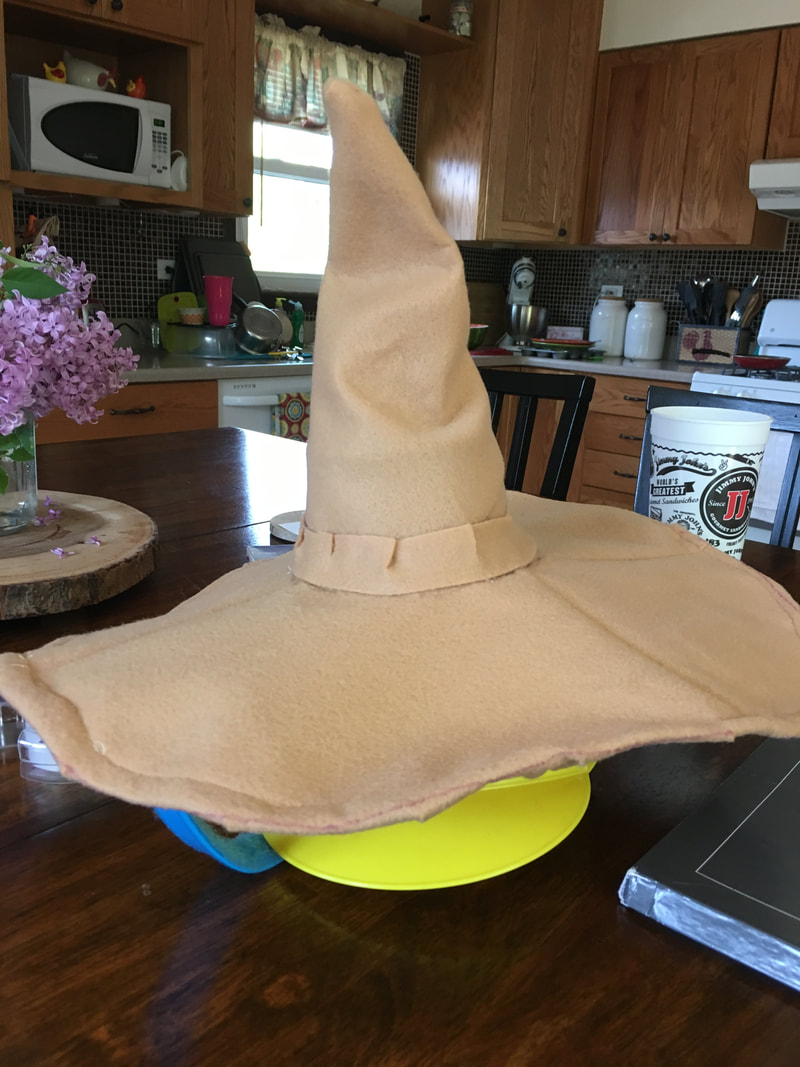
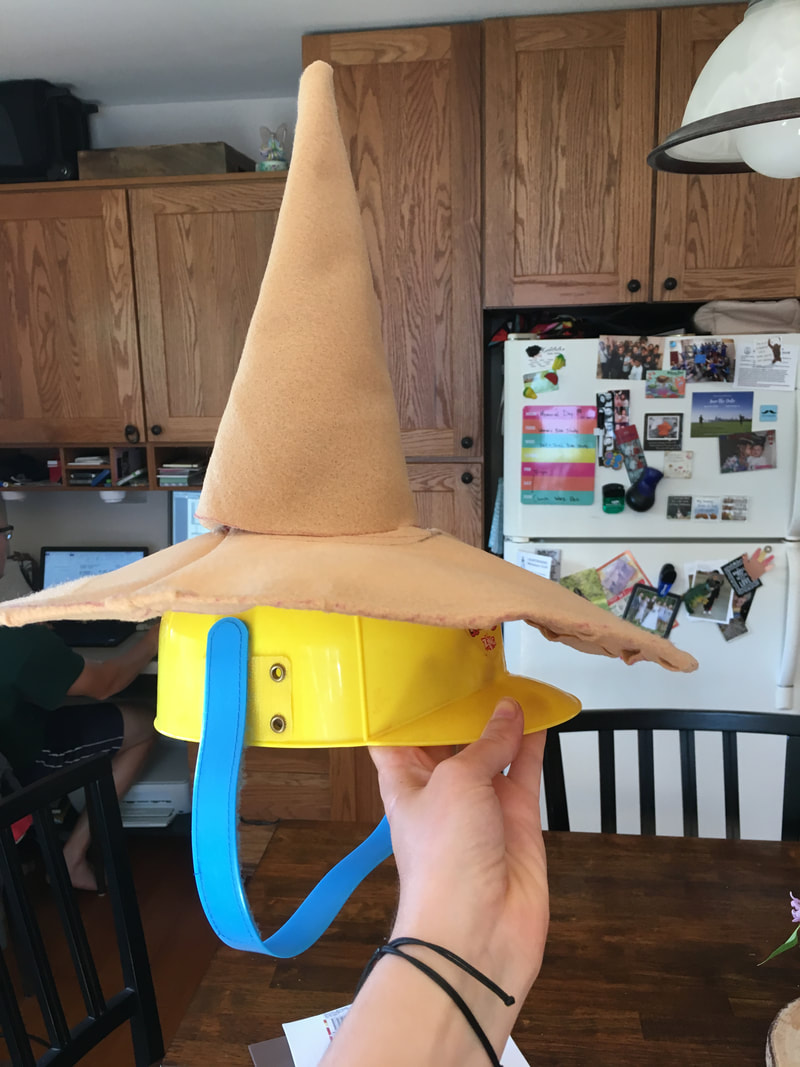
Even the sorting hat got a makeover this year. I just bought felt squares at Walmart and pieced them together on my sewing machine to make this look. Day Two This year was all about the brooms. I kind of followed the post from ikatbag here, but definitely shortcutted the process and wound up paying for it later. The brooms fell off a lot, but they were used a lot and the kids didn't care. I had to make 12 very quickly so using brown packing tape over plastic bags and then hot gluing kraft paper and house colored string worked for what we needed. This is what one of my brooms looked like. After this one I flipped it so the curve was facing in which was a little better I think. 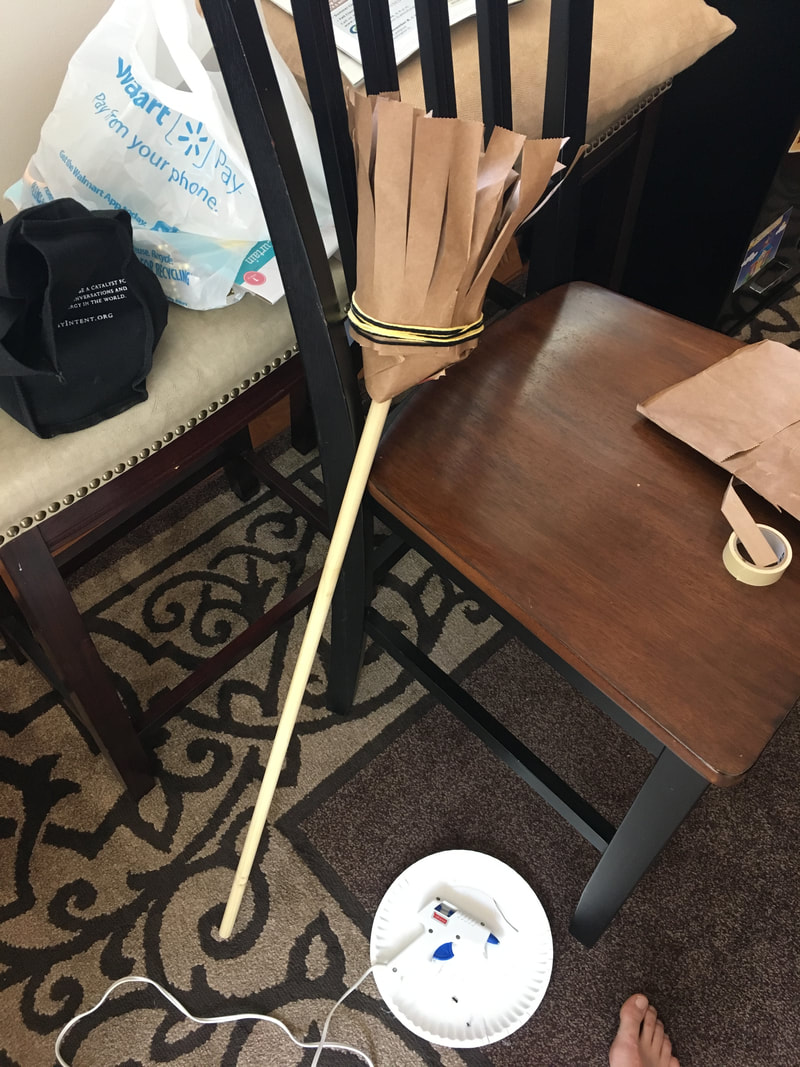 The game for task one this year was all teams started solving the same problem. Once they had their answer someone had to fly on their broomstick to the center of the room where there was a bucket of easter eggs. In three of the easter eggs was the correct answer. They frantically dug and opened them (and closed so as not to lose their house points) until they found the right answer. They had to then get back on their broomstick bring me the correct answer. They then would get 3 points for first place, 2 points for second place, one point for third place and 0 points if their house didn't find the correct answer. We would then start a new problem. The house with the most points at the end was the winner. A coworker had a tie in points and had them do a "flying" competition on their broomsticks and had the class vote for the fastest or most stylish flyer. Day ThreeThe only big change from last years frog game was this year every time they were correct and could get a piece from their puzzle, they could cast a vote for another team to lose a piece. Once a house had three votes against them, I took a piece back. It was an amazing addition and added another element to the game as they strategized and made alliances with different houses. Day FourThis year for the third task we went all out. We moved all of our classroom furniture to one side of the room and built a maze. And hid problems throughout the maze. We put all the chairs on the other side as an audience spot. The house that was up had to run through the maze one at a time and find a math problem. Once they found one problem they ran out allowing the next team member into the maze. They also could start solving the problem while the next team member searched. And added challenge (and way to keep the audience engaged) was that each house had a foam ball that they could through at the competitor in the maze which would stun them for 5-10 seconds if hit. This made the maze harder and kept the audience interested while they waited for their turn. Once they got out they had to solve their math problems and then use our code to find the correct spell they needed to say. Each house had a different spell so they couldn't cheat and use the first one. This was the sheet we made.  Once they had their answers they dropped the math problems into the "goblet" that awaited them, picked up the wand and said their spell. If they said it incorrectly you knew that they did their math wrong somewhere and had them start again. We made ours a little too challenging to find in the maze which led to really long sessions for each team, so it's definitely something we kept tweaking. Also, make you key far enough in advance to double check for no double answers. I think this was their favorite competition. The team that was fastest to say the correct spell took first and so on. Day FiveLast year we just took house pictures, and announced the winners then had an extended recess. This year we decided to add Quidditch. Another big hit! We followed most of the rules from John Kalkowski on teachers pay teachers (you can find it here) but adjusted numbers to match the explanation of Quidditch Oliver Wood gives from the first movie. We hung three hula hoops from two trees at either side of the course for the hoops they were trying to hit. We modified the scoring from John's version as well to make the game interesting. Keep adjusting until you get what works for you! 
Conclusion?Every year I'm amazed all over again and the community this builds student to teacher and student to student. Breaking them out of their friend group and the end of the year, working on those math skills that are hard to fit into the regular curriculum (which is how this all started with my Grammar Games), and just having fun learning together impacts our community so positively, the hard work in prepping it all is so worth it! Hope you got some good ideas for running your final week of school and wish you a happy summer!
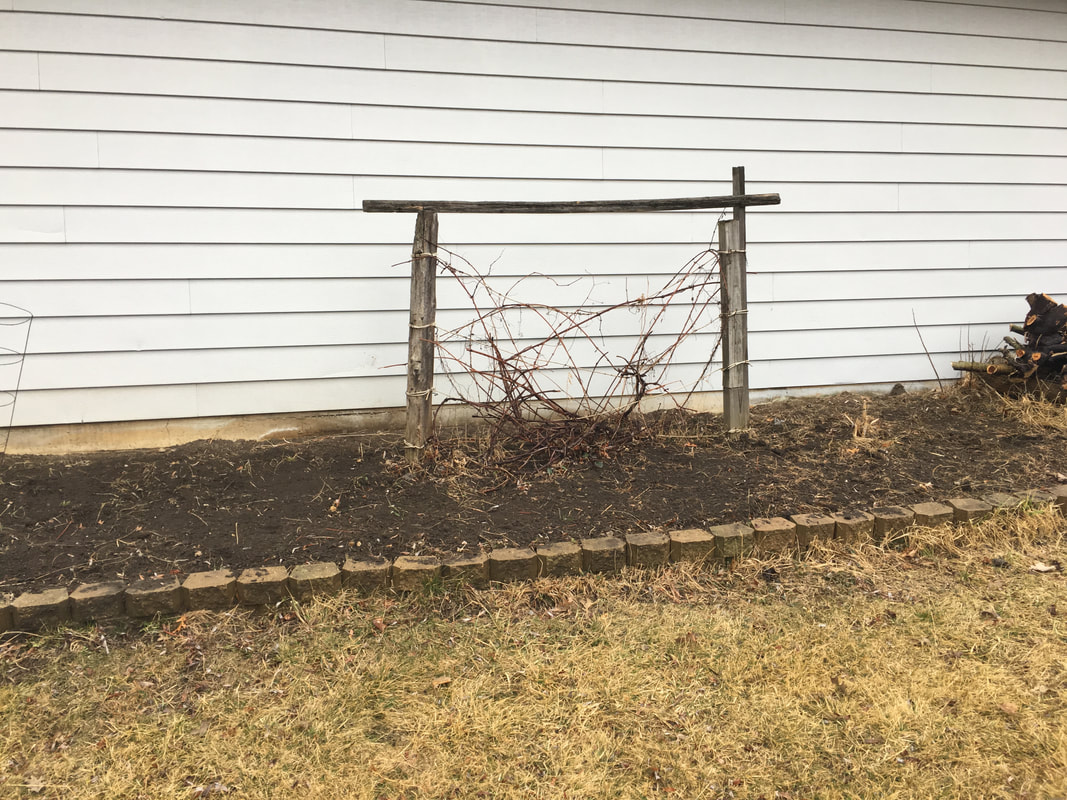
Today was a hard day. As I parked my car in the parking lot at school, I thought about all the challenging kids that are coming up to me for the bulk of my school day next year. I steeled myself against the thought by telling myself I'd pray for them all summer and with my teaching partner, we could take on anything. Later that day, my teaching partner, and best friend in the area, announced to our team she will be leaving next year. It was a crushing weight to think about the task that lies ahead. Her absence leaves me next in line for the math director spot which means taking on more responsibilities most likely, besides training a new partner in our math program. I came home with my mind still numb trying to understand what losing my coworker will make next year will look like. I couldn't start working on anything that required thinking so I went out into the yard and started pulling weeds. There are always plenty of those. The work is never ending and requires very little thinking. Once I got outside, I pleaded with God to speak to me. I asked Him to give me something for to encourage me. I continued along my path of weeding and finally stood up to look back at my work thus far. I was amazed at what I saw. If you read my post, 5 Life Lessons Learned from Weeding, you've seen what my front walkway looked like last year. If you haven't read it, here was the patch last year: 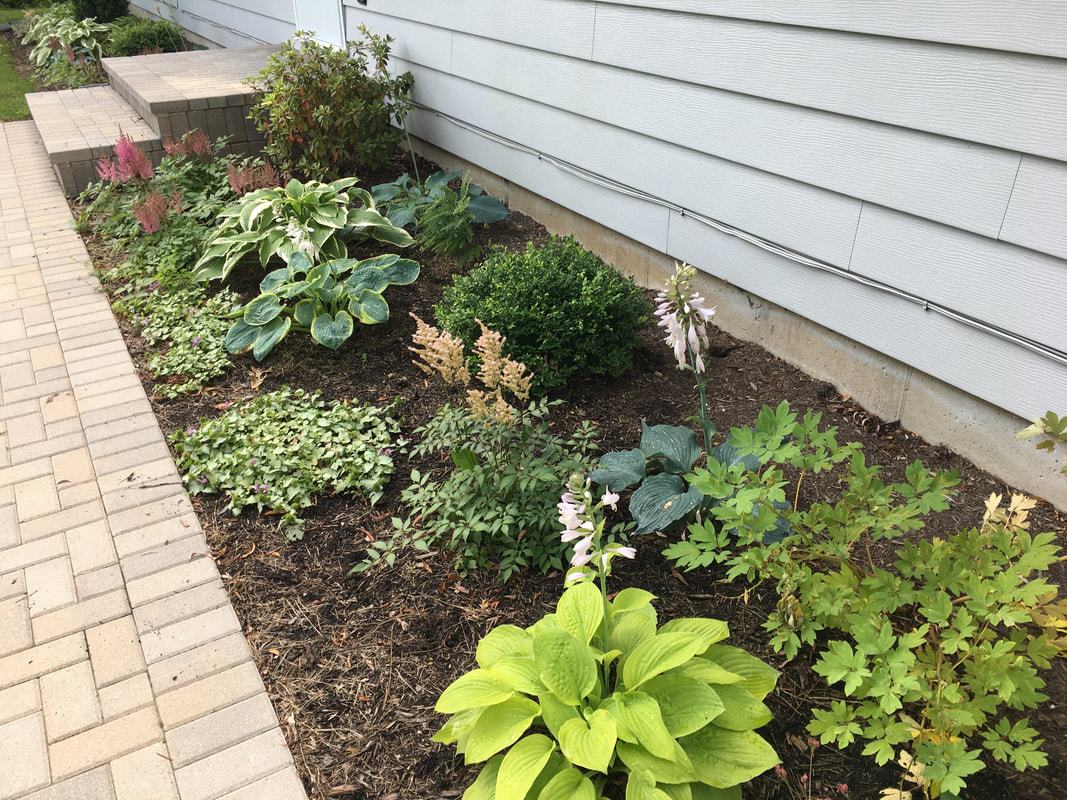 Nothing too spectacular, but I was proud of it being weed free after some hard work. It was nice as long as I kept up with weeding which I couldn't do as regularly as I liked. I also wasn't a very seasoned gardener; I knew I lacked knowledge and skill to make anything better, but diligently did the work I knew how to do to keep it alive. Then tonight as I stood up after asking God to give me a life lesson this is the sight that I laid eyes on. Same walkway but from the steps instead of the driveway (please excuse the weeds I have yet to dispose of on the walkway): 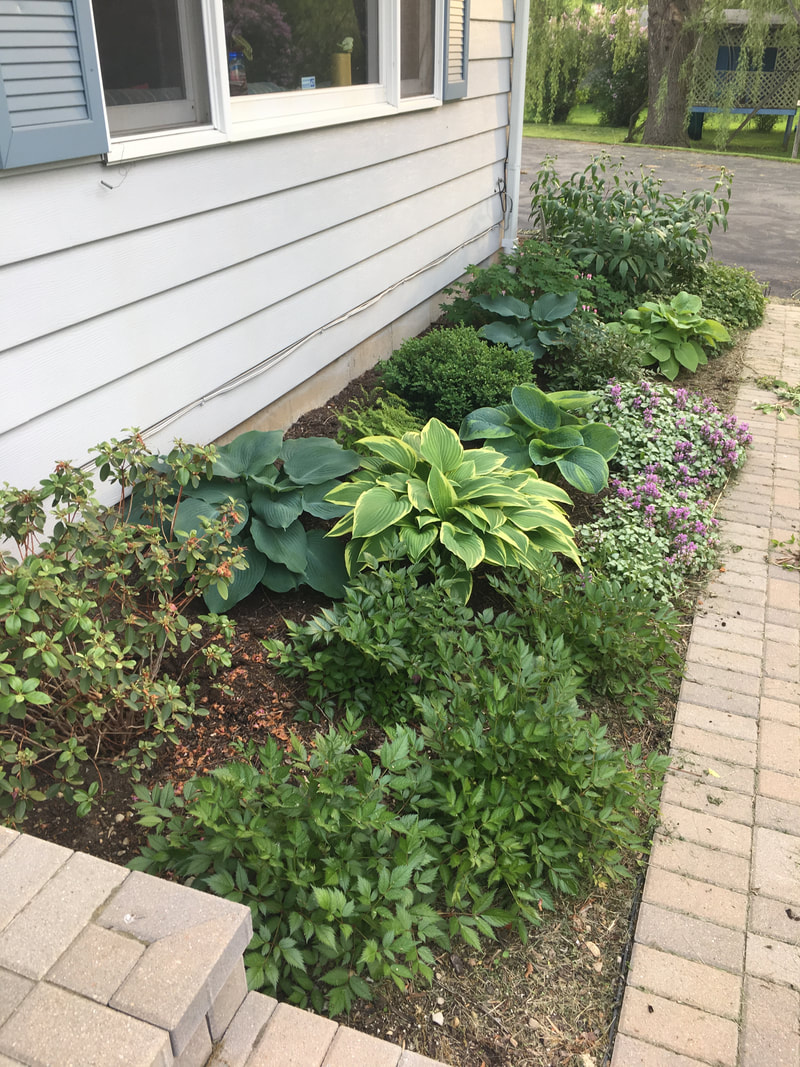 God spoke clearly. I saw a garden that had grown and matured under my work and in my care. Despite the fact that I didn't know everything there is to know about gardening, the plants got bigger. I didn't neglect the garden and God was faithful enough to do the rest. As I admired His handiwork on how much it had grown, He reminded me of my classroom. I do not have all of the answers. I am in no way an expert or the best teacher just as I am not the best gardener. Even though it's harder to measure, God promised me that my kids are growing just as these plants did. That even though sometimes I can't give my career and the kids I'm teaching as much time as I'd like, just like the weeding, if I am diligent in my work and do the best I know how to He will be faithful to continue to help my students grow. Thank You Lord, for the peace of mind that despite what difficulties I face, I don't have to face them alone. I have One powerful enough to turn my meager efforts into something beautiful!
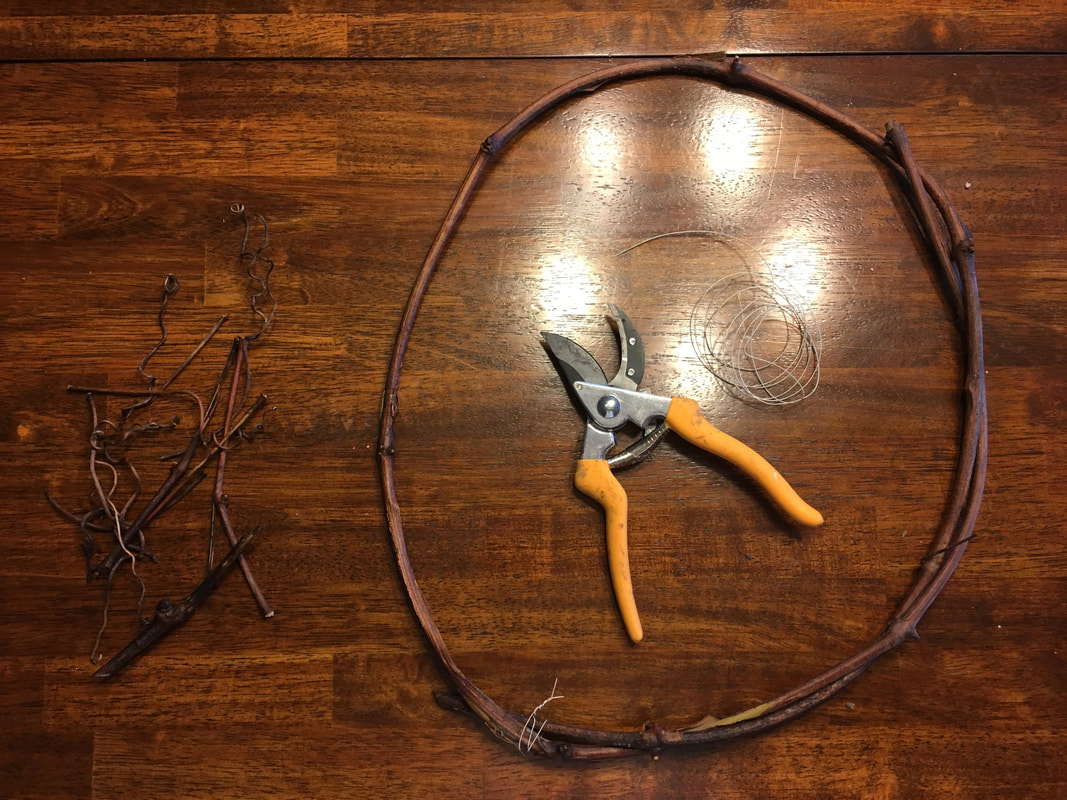
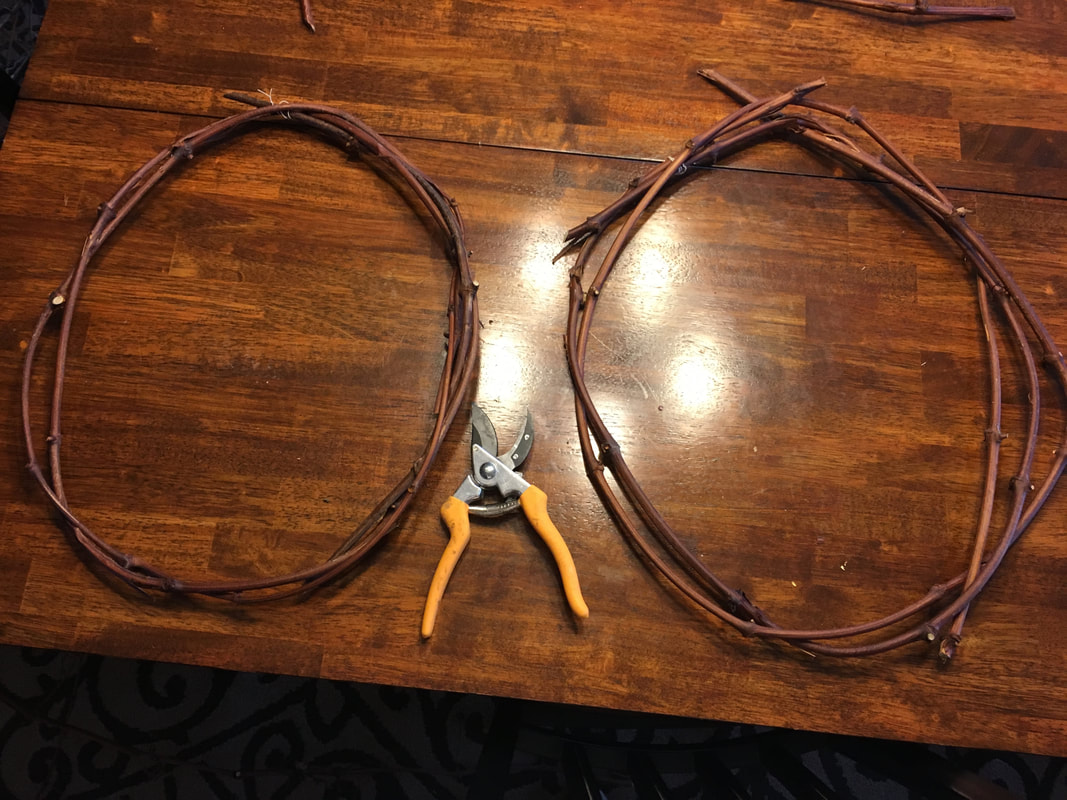
 You may note the color of our grass means we were doing this in a bout of spring fever but far before time we could actually plant. The Spring Fever had hit hard and I was ready for spring. As I was throwing the grapevines onto the bonfire pile, my mom suggested instead I make some grapevine wreaths. This would be a good way to bring in a little spring even though I couldn't start planting yet. I again, searched YouTube since I had no idea how to do this. The videos were helpful but it was still not one size fits all. I pulled in my mess of vines into the house.
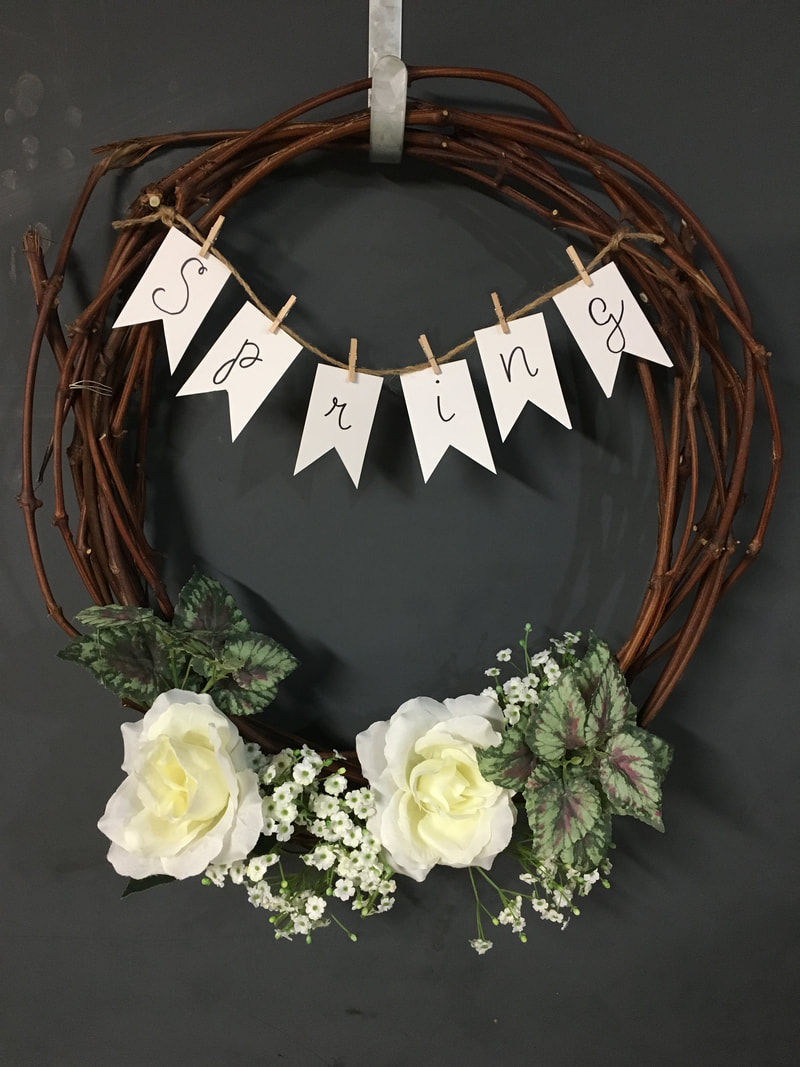
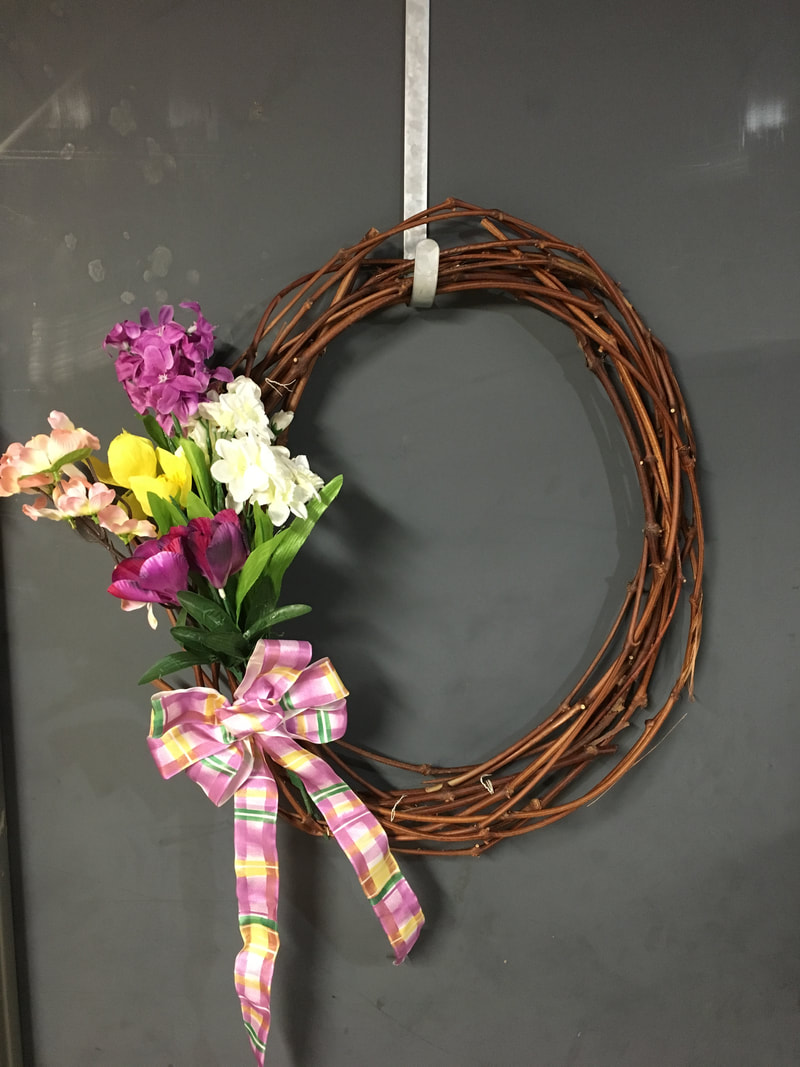
After you have the thicker piece in your basic shape, you go back and grab thinner pieces and just start wrapping them around. It worked best to wrap it from around the outside, through the inside of the wreath and then back through the outside to inside. Wrap it through the gaps when you can. Again, wire helps pull some of the vines in to get them closer to where you needed it to be. final wreaths certainly were not very "full" compared to pinterested grapevine wreaths, but honestly, with doing too I just got bored of working the vines and was ready to move on. I also kind of liked the simplicity of the fewer vines. At this point I grabbed them and headed to the craft room. Here I started decorating them with my plastic flowers from the Dollar Tree. They have tons of options and it's all $1! I also broke out some ribbon from the collection my Grandma has been making for me over the years and some old twine and mini clothespin leftovers from my wedding. With a little pinspiration, we made to spring-worthy welcome wreaths for my doors!
 I played with wrapping the ribbon around, but felt that limited it to looking like an Easter Egg and wanted my wreaths to last long past Easter. The best part is, you can't really mess it up! You can try something, and if you don't like it, just rearrange! I used only wire and twisting it through the vines to attach so I can change it for the seasons but you could use hot glue for a more permanent attachment. After posting, I had people asking if there were any available for them to purchase which was an amazing feeling! Also knowing how little it cost me, could be quite profitable. Perhaps you are sitting at the end of this thinking: "that's great for you and other people with grapes growing in their yard, but I don't exactly have grapes growing out my back door" do I have news for you! Another response on Instagram was from a friend who is a vineyard keeper for a winery. He told me if I was interested in more vines, he would be able to give me, literally, tons. So if you are interested in giving it a try, ask a nearby winery when they will be doing their pruning and if you can snag a few vines for this fun DIY project. If you do give it a try, or have already done one, comment with your wreath to share some ideas with me for next spring or any season! Summer Update: Best Part of these wreaths is updating them for the season! Although it is still cold and rainy here, I'm one week away from summer vacation and that's summer enough for me! Because of that I'm updating my wreaths to move on from spring to summer. Here are my summer versions
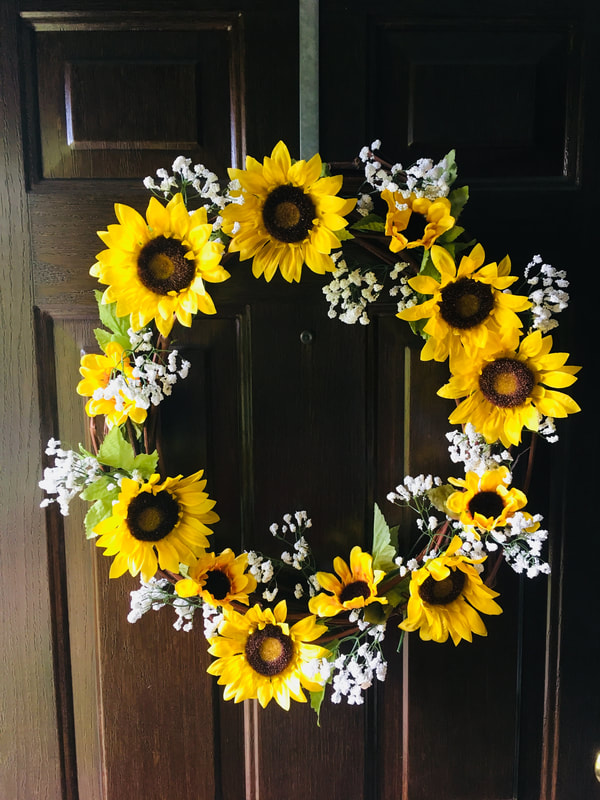
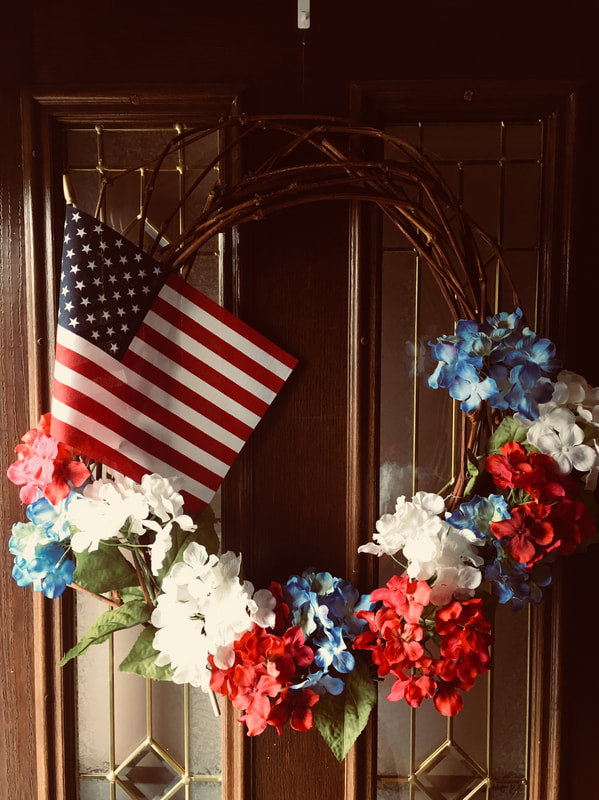
Sunflowers to welcome the sunshine (hopefully, we see it soon) and red, white and blue since summer is sandwiched between Memorial and Labor Day with the 4th wedged in the middle. To me they both scream summer. All pieces were acquired at Walmart or the Dollar Tree making them affordable. Plus, all of these will be reusable each year! The sunflowers were made with two "babies breath" that are Styrofoam beads from Dollar Tree and one bigger $3 sunflower and a smaller $1 Sunflowers from Walmart. The Red, White, and Blue Wreath toppings came from Walmart (flag was $0.97 and two red, white and blue geraniums for $3 each). Making the grand total for both (off of the reusable base) $13 or $6.50 a piece.
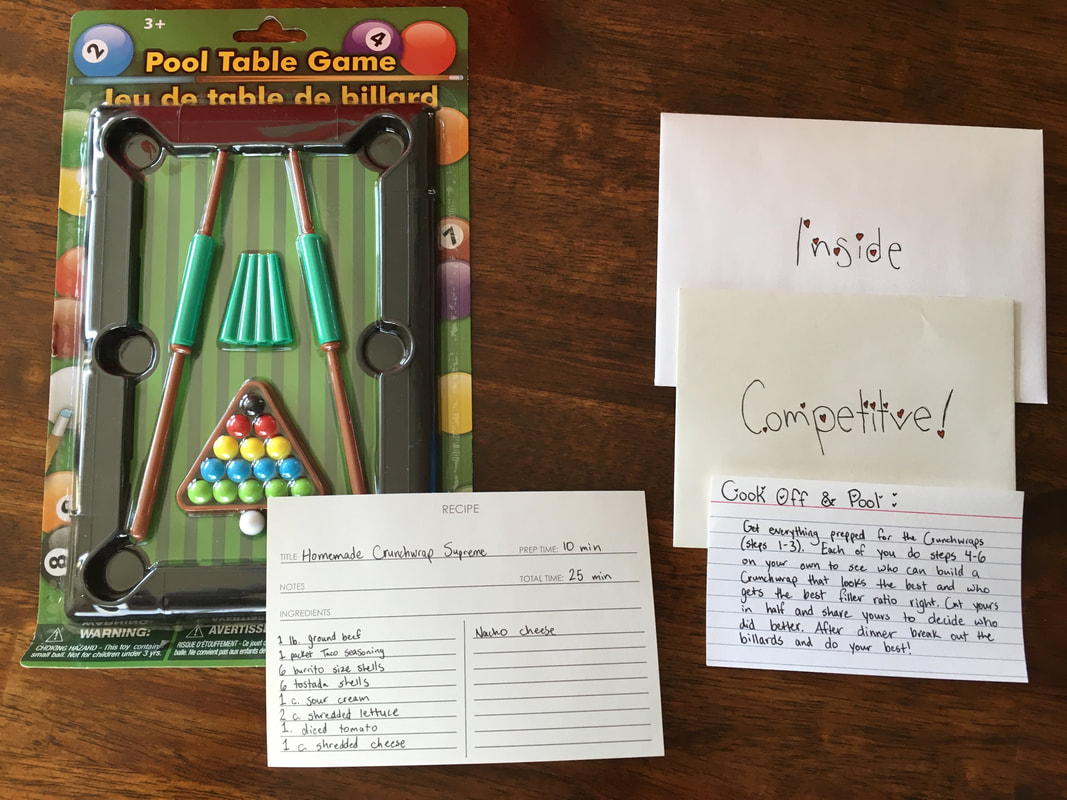
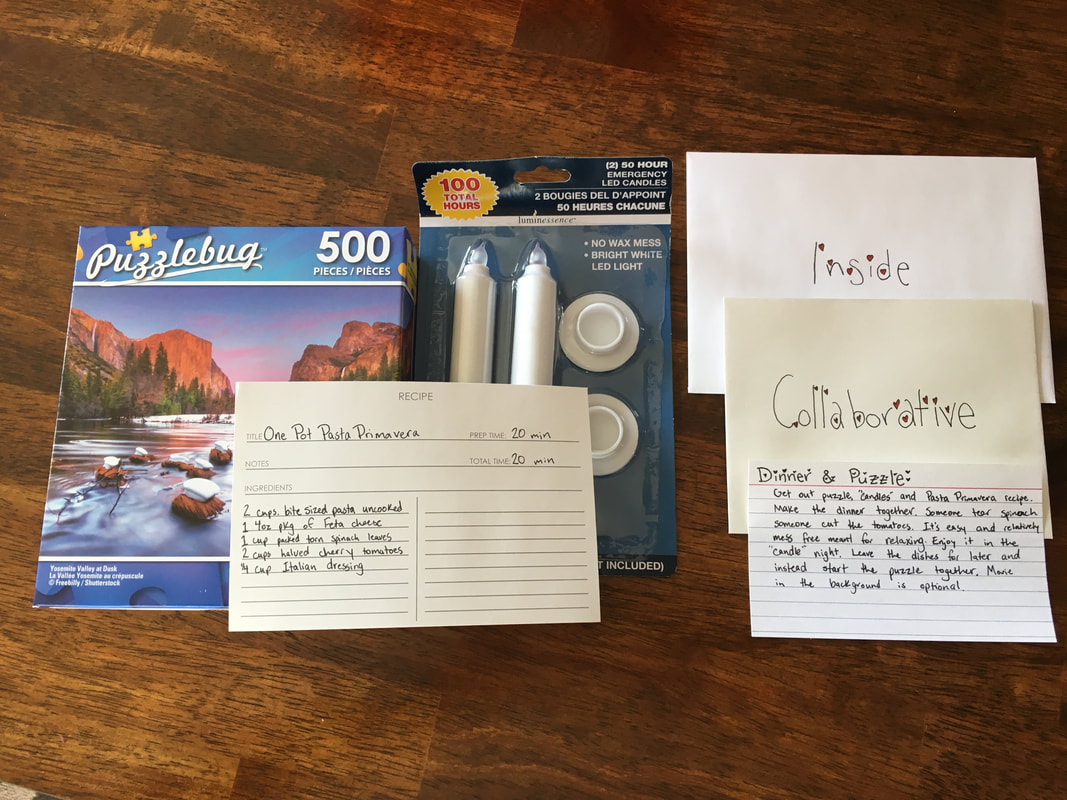
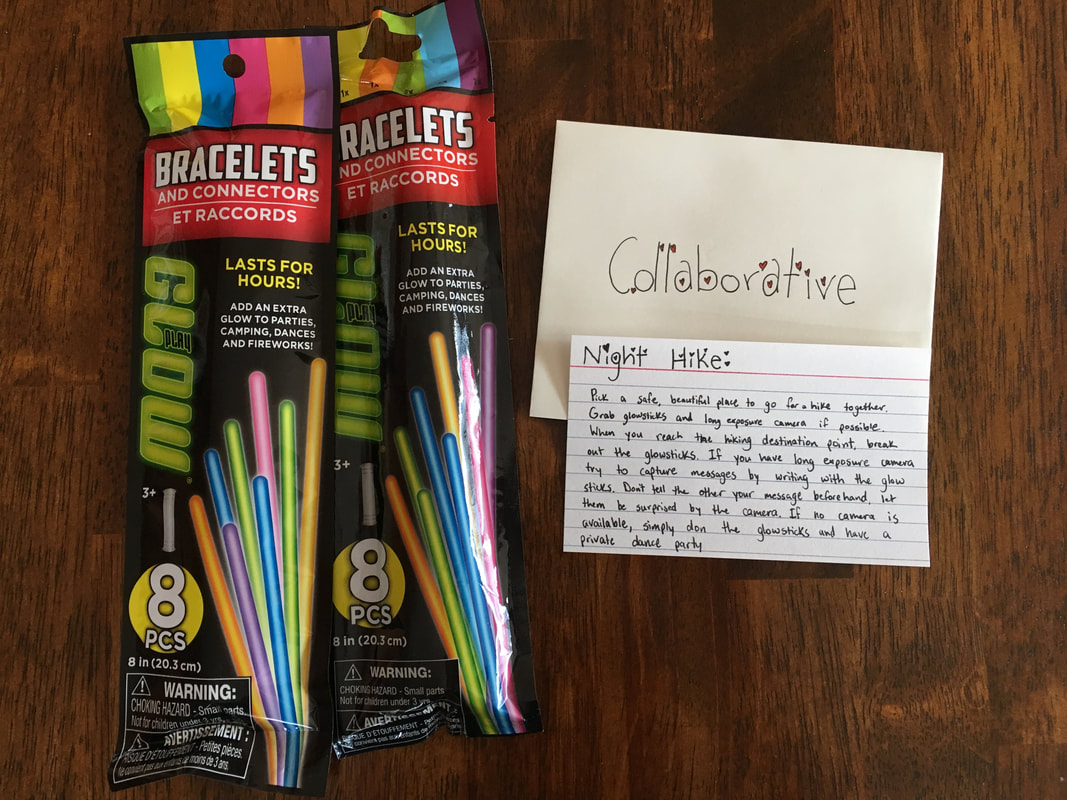
little we can afford to spend on a gift with the time we take in selecting the perfect one. Now we have to fly with it too so it's getting to be a challenge. Until now. Meet my DIY Date Box. 1. The Idea
2. The Beginning
3. Final Product
This is a sweet idea because the pictures will also keep the date documented and be one you won't forget, like this camping trip from 2013. If you have no long exposure camera, play instead some of your favorite tunes and have a private dancing party at your destination under the stars. Final Thoughts:This entire gift cost $10 to put together and will provide entertainment for four evenings. No, I don't expect these to be the best dates they ever have, but dates don't need to be extravagant. Just taking the time out of your schedule to say, "You are my focus for the evening" is sometimes all you need. This wedding gift will provide them with four nights where they can use someone else's idea for something different. We love that it focuses on the marriage, not the wedding. We'll keep you posted on how it goes over.
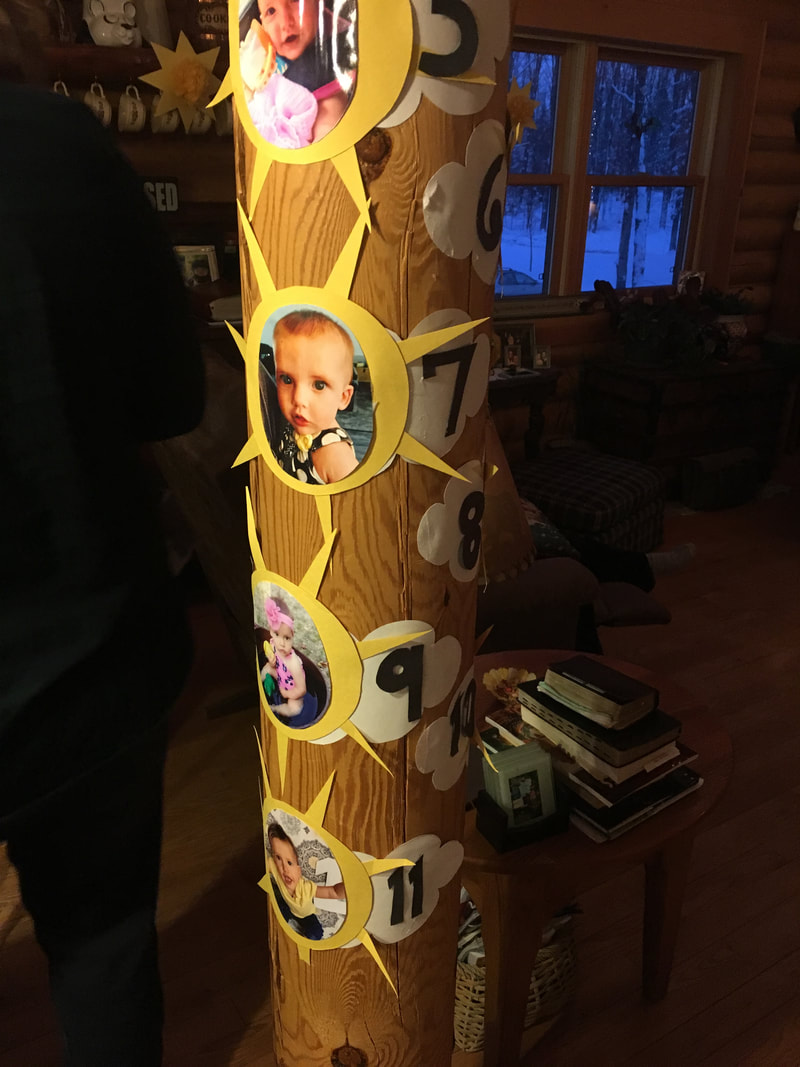
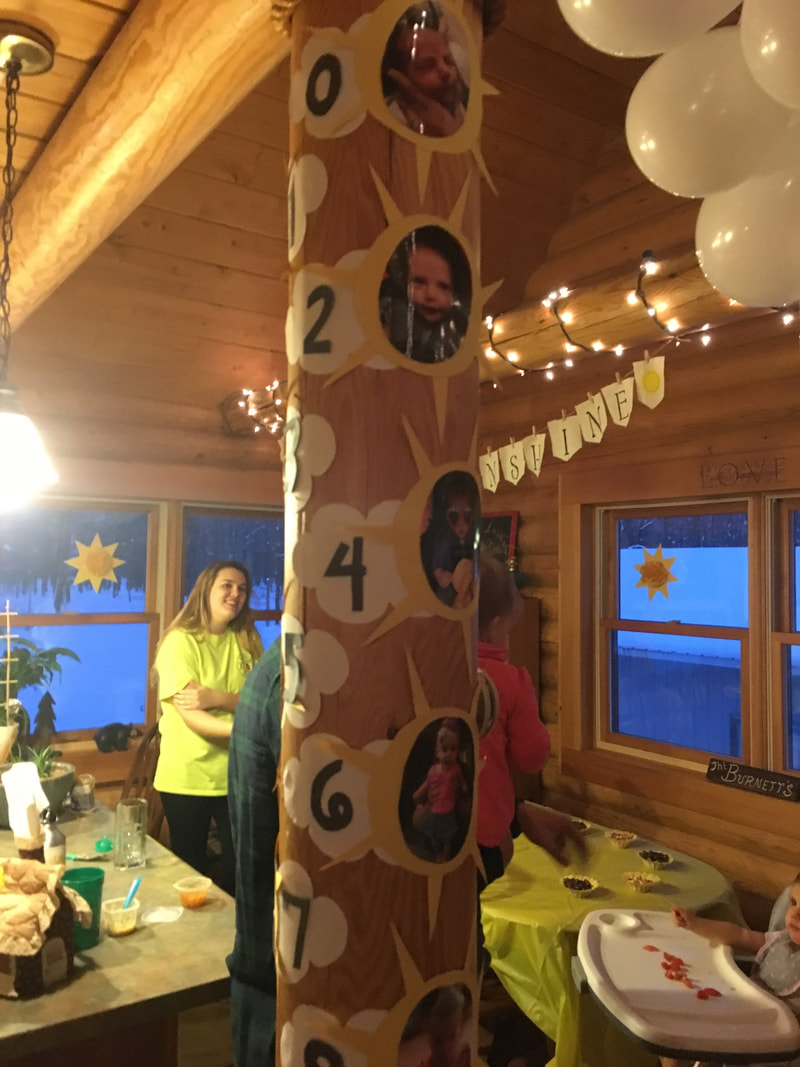
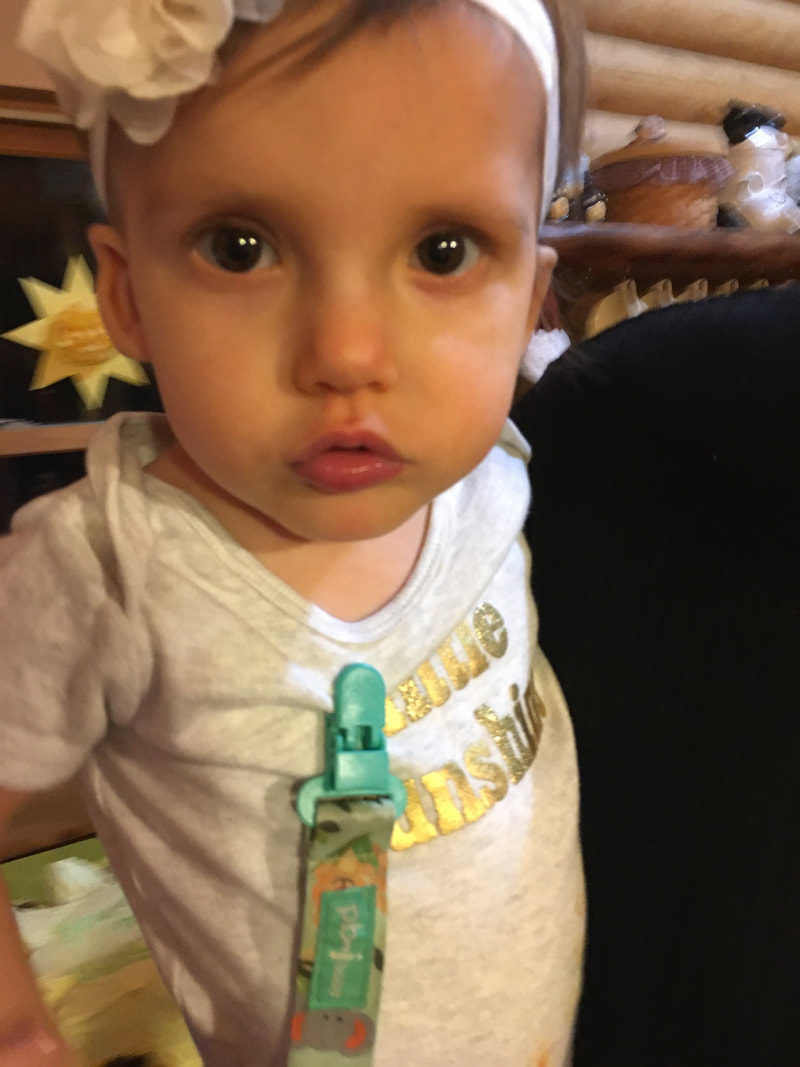
Recently, my niece turned one. I can't believe it! Look out how big (and adorable) she's become!
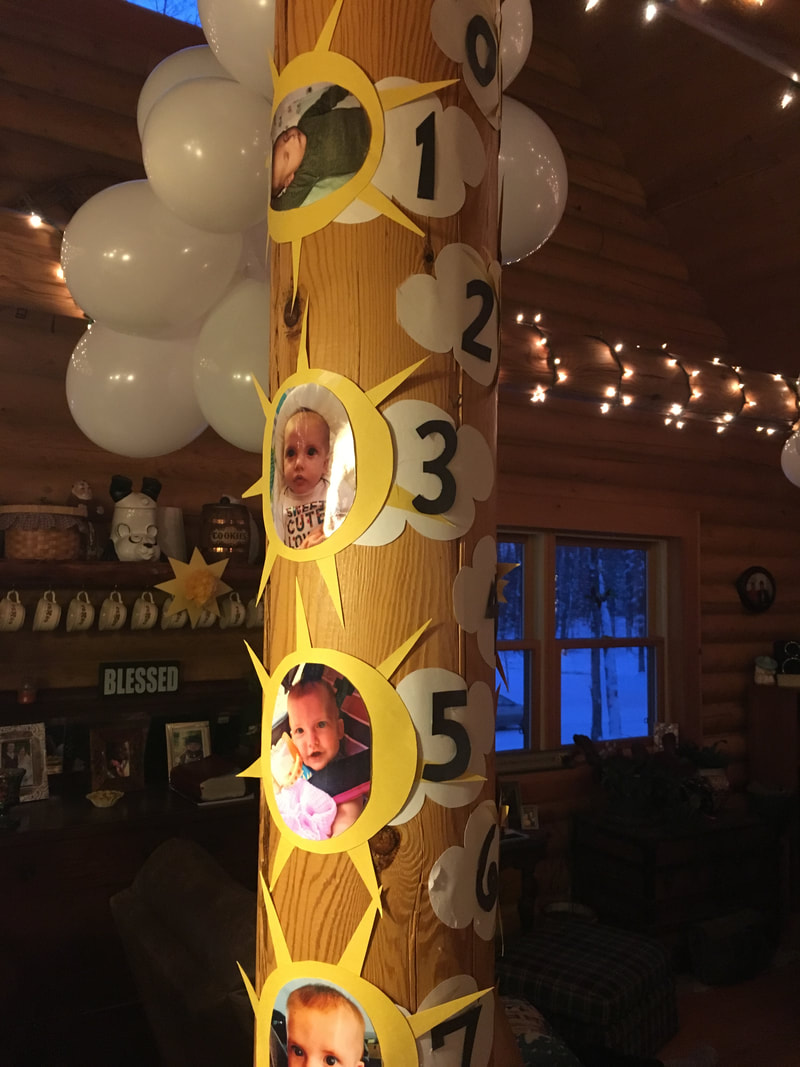
in our conversations with and about her. It only seemed natural that her first birthday be a sunshine themed birthday party! Here are the pieces to our DIY Sunshine party! The "throne" This is the first piece my sister commissioned to me. She had found something like this on Pinterest and wanted me to recreate it for the high chair. I bought a canvas-y cotton at Michaels for the backdrop and yellow and gray felt (the 99 cent pieces were enough for the pictures and "writing"). I used left over twine from my wedding decor to hang it on and bought the value ribbon/on sale ribbon from Walmart for the sides. I cut the pieces out exactly how I wanted it, hemmed the edges of the cotton and stitched down the middle of the pictures and letters to fasten them on. If you'd rather purchase instead of DIY, check it out here. The BannerMy sister has dubbed me the banner master because I make a banner for everything. This was no exception. I used the left over cotton pieces from the high chair sign to cut out each pennant. I was under a bit of a time crunch and so I didn't sew the edges to this one. Using stencils and washable paint I wrote out the you are my sunshine part and did the suns. For fastening we hung more of that left over twine and baby clothespins (again, left over/reused from my wedding).  Decor
We can not claim either of these as our own ideas, but I love how they turned out! The suns with the cloud for each month of my niece's life was a fun piece for guests to view and for us to see the change. It was just as much fun for my sister to put together to reminisce over the past year of her daughter's life. I would recommend for a sunshine party. You could do years instead of months if this is not a one-year-old's party. The second big decor piece was the clouds. Again, not an original idea even though we worked out a plan on our own. My sister purchased white balloons and fishing line. My husband got the task of blowing up and tying the balloons to the string. It didn't look quite as "cloud" like as my sister hoped at first because they tied in a line, but we twisted it up before hanging and were satisfied with the end result.  Food We did a light, build-your-own, sandwich bar because it made it easy to meet the needs of the diverse dietary needs of our guests. However, the crown piece was of course the cake. My mom was put in charge and did a vanilla cake with a raspberry layer filling with whipped topping from GFS (her absolute favorite). She was proud of thinking this up all on her own, although others have also. Two round cakes made the sun. The first for the middle piece, the second she cut into 8 equal slices that became the rays of the sun. My sister dyed the frosting yellow and wrote except for the little bag of green for the writing it tasted just as good as it looked! Overall
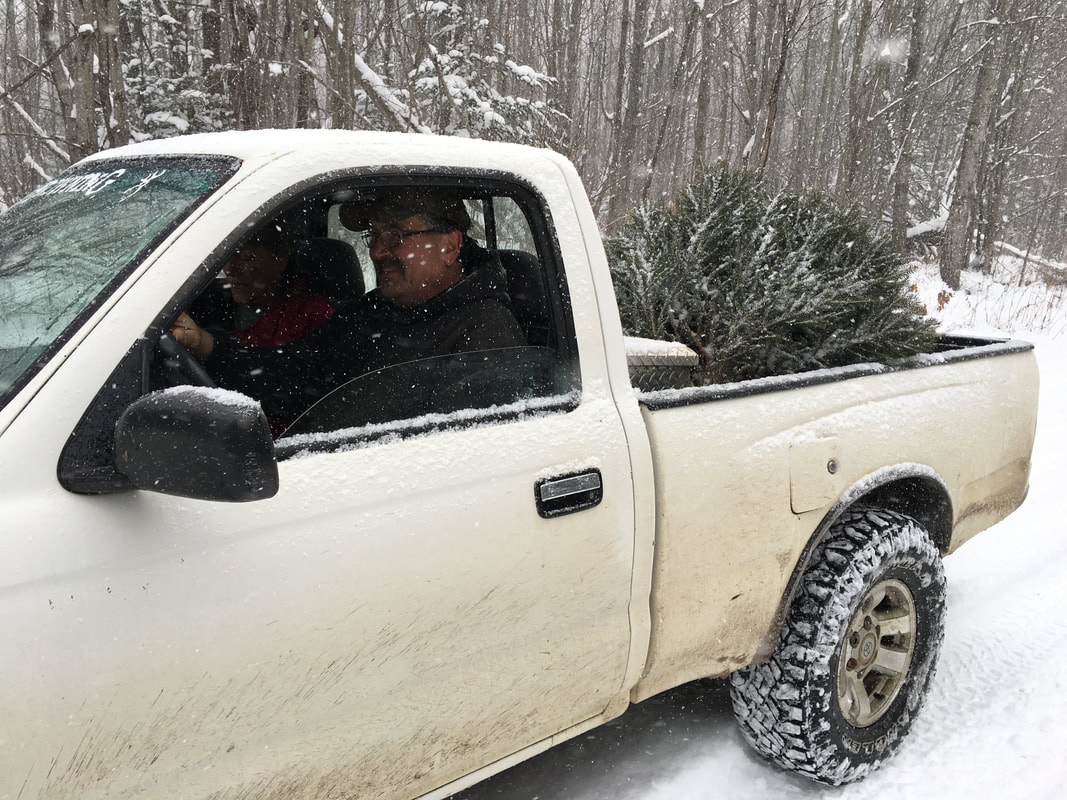 This weekend we went to get our Christmas Tree. It was magical to relive the family tradition with my parents and my husband. Our tradition of cutting down a tree is a little, well, nontraditional. We always cut one down but not from a tree farm. We drive out into the woods until we find just the right one that nature has grown for us and we bring it home.
A quick google search of Bentley's Snowflakes will show you his marvelous pictures and reveal just what a masterpiece each one of God's snowflakes truly are. Below are just a few of his photographs of real snowflakes! (The picture link will take you to learn more of his story).  God drew my eyes up from the individual flakes on Tyson's fur to the forest blanketed in snow. At that point He whispered to me, "I have taken the time to design each of these flakes to be uniquely beautiful. No one could ever admire each one's beauty and often they don't last long enough for people to study them even if they wanted to. The ones that do last, get clumped with so many others, no one can possibly admire them as individuals. Still, I take the time to do it right and make each one beautiful because, doing your best is worth it, even when no one else notices."
We all have those days. The days where everything goes wrong. Well, that has been my week. I have been taking on a lot of extra to help with the people at my job who are sick, or tired, or mentally exhausted, and in turn doing the same to myself. I came back in my room after leaving it with a sub for an IEP meeting and found this on the board:  I could have cried tears of joy. This made such an impact and made all of the craziness go away. I had worked so hard and I felt it had paid off and was recognized. This is what I jokingly (kind of) called a career saver. I had picked up after people and stretched myself thin for them in helping clean, volunteering my time and planning other lessons and this made it worth it. But I've always been that way. 'No' is not in my vocabulary. I do. I like to do. When someone says they wish they knew someone who could _________ or need _____________ and I can provide that good or service I volunteer. It's a joy that I have. One of my favorite hobbies. However, it can stretch me thin, and then I can't do things very well. When I reach that point I feel I lose my worth. If I can't preform, where is my worth to this person? This last week a song played on the radio and it has changed my life: "God you don't need me, but somehow you want me"This line jumped out at me and stuck. I couldn't get it out of my head. It was such a beautiful thing that I had a God that loved me not because of my abilities or my skills but because I am His. Even when I am stretched thin and am not at my best, He loves me the same. I will never do enough to not have Him seek after me. The song is exactly what I needed for times like this. It's okay that I don't know what to do or that the day didn't go well. I give it all to Him who guides and leads always.
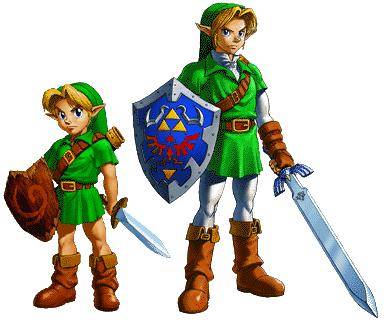
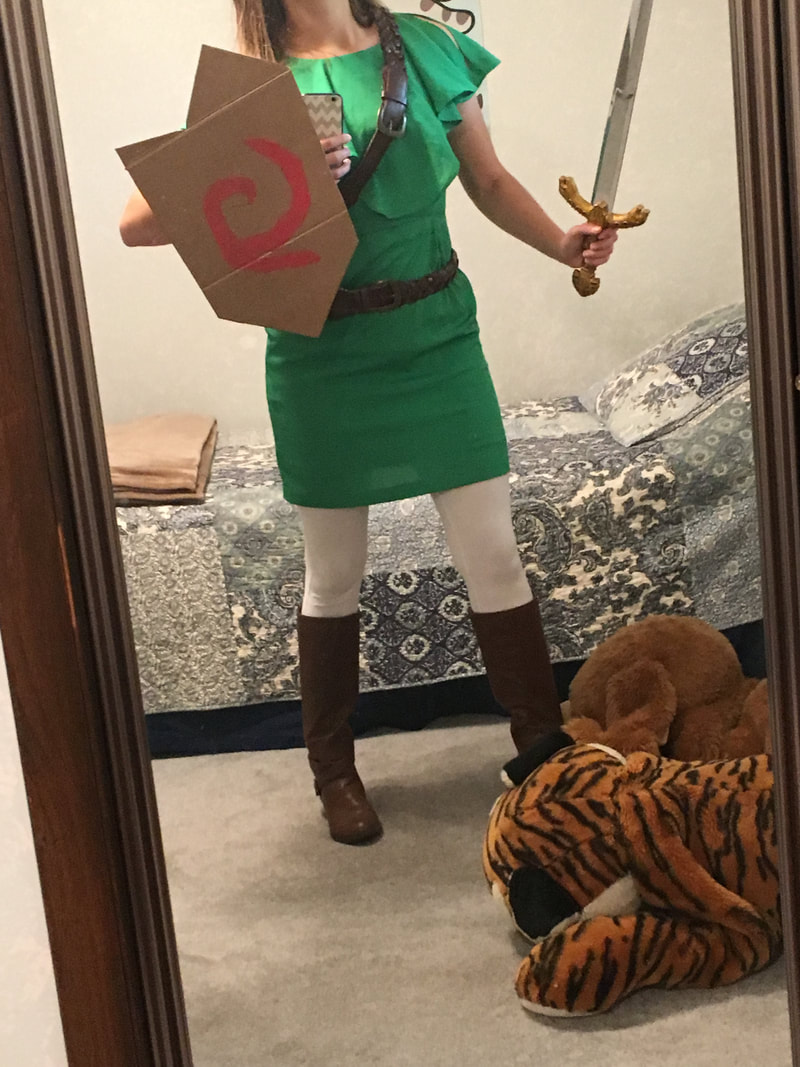
Even in the crazy days with the IEP, mom was supportive and it was refreshing that the meeting felt like we had made a difference. He gave me the energy to get through the day. When I didn't have a plan, the kid that relies on structure and repetition to be successful was absent. Not only does He not need me but want me, He wants me bad enough that He shows me these supernatural tokens of affection to take care of me. Lord, this has been a hard day. Hard week. I am so grateful for Your love that is so unjustified. Just like the song says I give You control because I know You love me enough to get me through. This morning I woke up to an invitation to join a collaborative board on Pinterest. Check out Cosplay is Bae on Pinterest to see my pins there also. Starting with that I hope you are understanding of me posting about my Halloween costume in December... So let's pull out our Ocarina's and go back in time.
So I set to work on the shield. Because the Deku shield was brown I started with a cardboard base. I used our Costco sized cereal boxes which were big enough when unfolded but still malleable enough to make my handle.
Hope this gave you some good ideas for your next event!
|
AuthorI am someone who loves to write. I like to think and be creative. I was encouraged by my husband to write more and so this is me writing. Hope you find something of value in these words. Archives
December 2019
|


 RSS Feed
